Get Started
Most people doing this are setting it up for a parent or an older loved one. Here is the whole journey before you start, so nothing surprises you. Plan on about 15 minutes if your Ring cameras are already in use; or about 30-40 minutes if you’re starting from scratch (no Ring app, no cameras).
What you’ll need
- At least one Ring camera covering an area where a person might end up on the floor
- The Ring app on whoever’s phone will be managing this setup
- A paid Ring subscription on that account — Ring requires it before any app can connect
- The monitored person’s knowledge and consent — this is never a hidden camera system
- The person being monitored should not be located in Connecticut, Nevada, New York, or Washington. (see the very bottom of this page for more info)
Where to put the cameras
Make sure your cameras can see someone on the floor.
- Windowsill height or higher is usually good. Atop cabinets or mounted on walls may be even better, but if too high then it gets harder to discern if someone is on the floor or just on a very low sofa.
- One camera per area is much better than none, but two cameras seeing different angles on a large area is much better (for instance, so that the floor around a kitchen island can be seen, or the floor behind a sofa in the middle of a room).
- Also think about garages, stairwells, hallways, and patios. For instance, the right camera placement in a living room can usually also see into a hallway. In my house, one camera in the living room can also see onto my patio.
- Bedrooms and bathrooms are a no-go for cameras since there is an expectation of more privacy in such areas.
The big picture
Get your Ring cameras working
Ring app installed, a paid Ring plan, and each camera showing you its live view.
Connect IsMomOnTheFloor to your Ring account
From the Ring app, find us in the Ring Appstore and approve the connection. Ring then opens our website on your phone.
Sign into IsMomOnTheFloor
Your Ring account email address IS YOUR SIGN-IN to our app, no password needed. Then fill in your settings, including consent.
Go back to the Ring app
Make sure every camera’s switch is on, and meet the Go to app button — your way back to your settings any time.
Part 1 — get your Ring cameras working
If you don’t have your Ring cameras set up already, open this section to see what to do.
- Install the Ring app on your phone.
- In the Ring app, create or sign in to the Ring account that will own the cameras. Note its email address — you’ll use the same one in Part 3.
- Choose a paid Ring plan. Plans start at $5/mo for 1 camera, $10/mo for multiple cameras, and $20/mo for multiple cameras plus many other features. A paid Ring plan is needed before your account can connect to third-party services like ours — any paid plan works for IsMomOnTheFloor, so choose based on your own needs.
- You need at least 1 Ring camera, and it should be a plugged-in model — battery-only cameras sleep too deeply to be checked on a schedule. Make sure it’s working: you should see what it sees in your Ring app. (We check cameras very often, which will drain the battery on battery-powered cameras.)
- Aim each camera so the floor areas where a fall could happen are in the picture.
- Leave the Ring app’s own Motion Settings alone (including Ring’s “Motion Sensitivity”) — lowering them makes your cameras report less motion, which slows down our extra motion-triggered checks.
Part 2 — connect IsMomOnTheFloor to your Ring account Start in the Ring app. Ring will pass you to their Appstore, and at the end of this section they will pass you to IsMomOnTheFloor.com
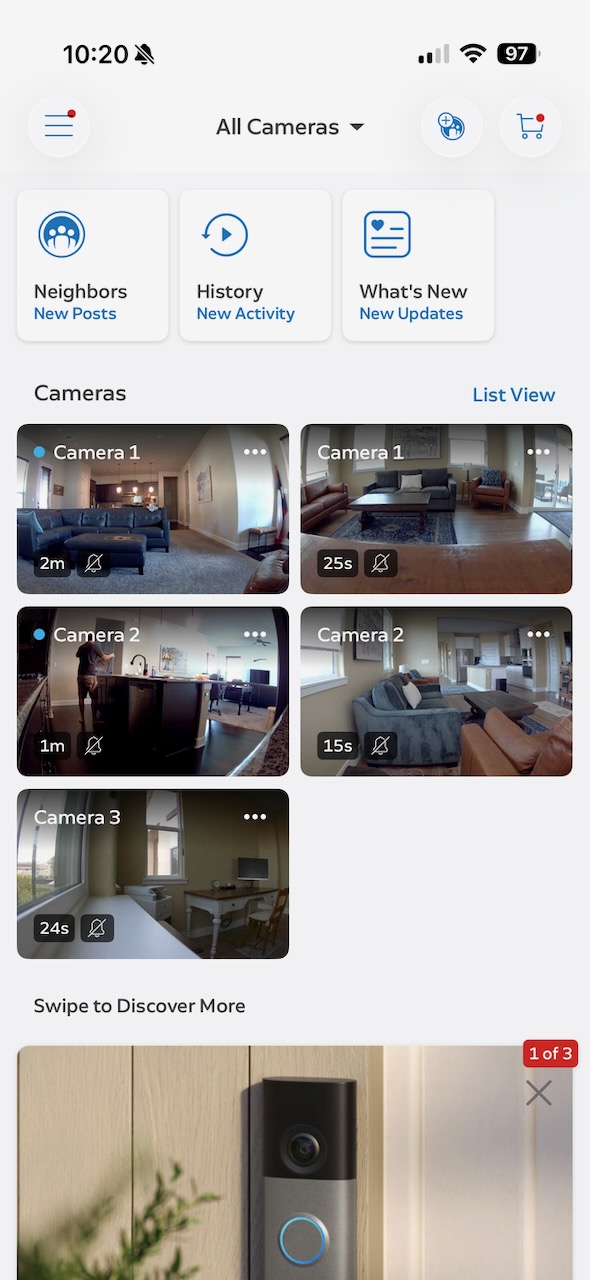
Open the Ring app and tap the menu.
Start on the Ring dashboard — the screen with your camera tiles. Tap the menu button (☰) in the top-left corner.
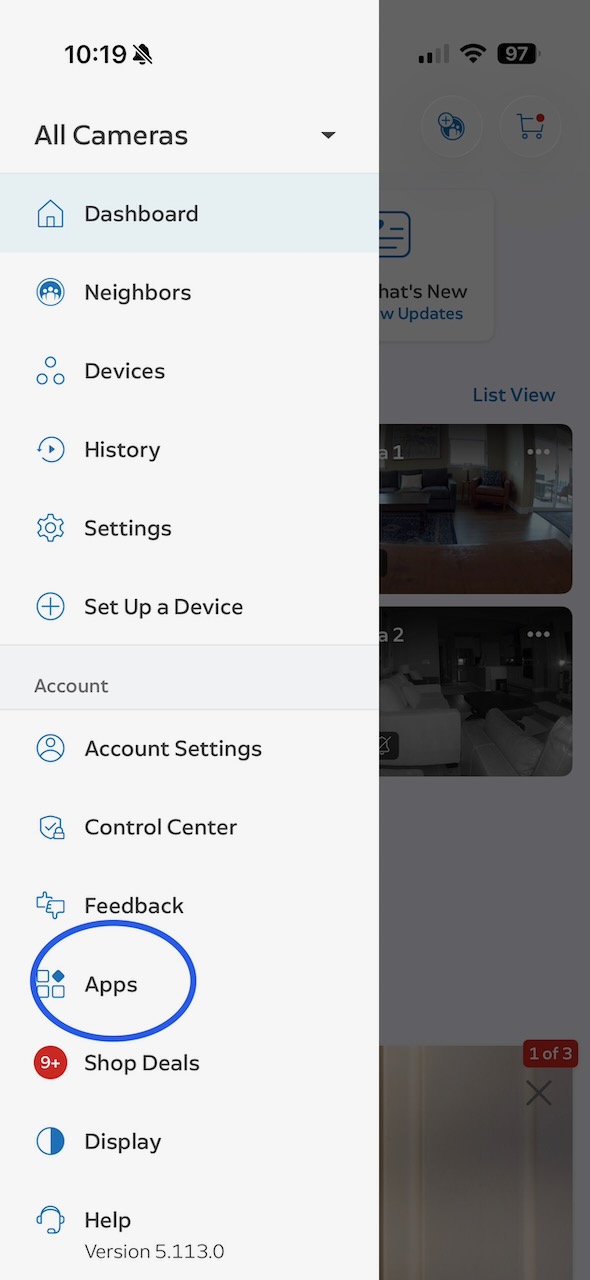
Tap Apps.
In the menu, scroll down to Apps (circled) and tap it.
Remember this spot: Menu → Apps is also how you get back to IsMomOnTheFloor inside Ring later on (Part 4).
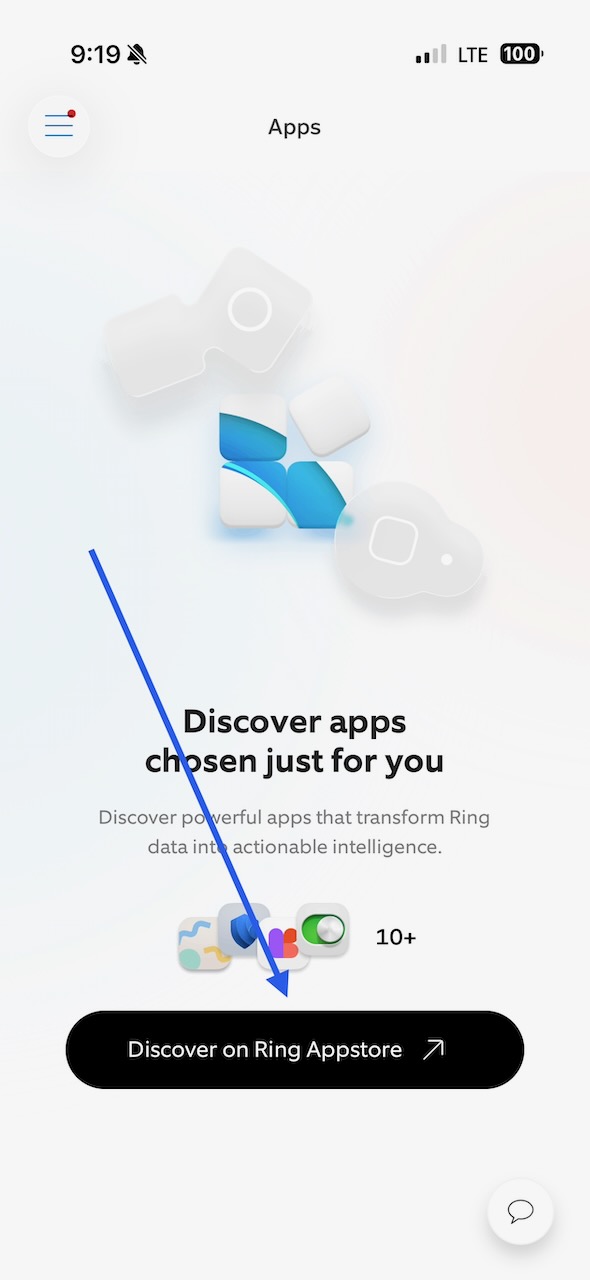
Tap Discover on Ring Appstore.
The first time, the Apps screen looks like this. The black button opens the Ring Appstore — that’s Ring’s website, so your phone switches over to its web browser.
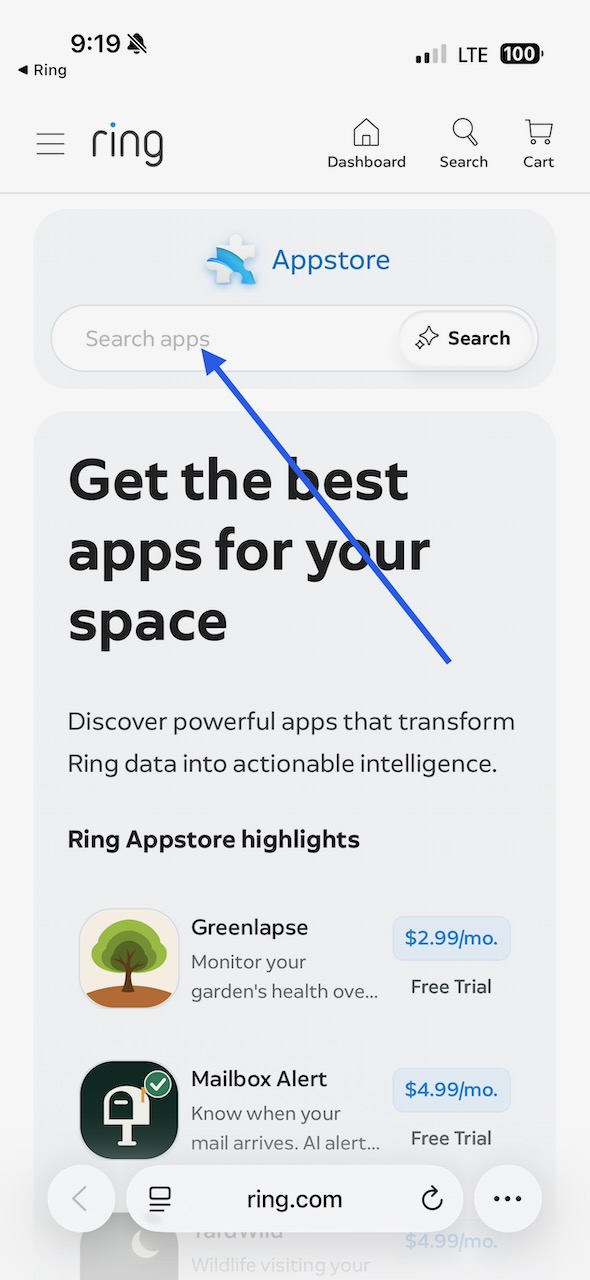
Search for IsMomOnTheFloor.
Tap the Search apps box near the top and type IsMomOnTheFloor.
If the Appstore shows a Sign in link near the top, you’re not signed in to Ring’s site yet — sign in with your Ring email and password first (that’s Ring’s sign-in, never ours). Our app doesn’t show up in searches while you’re signed out.
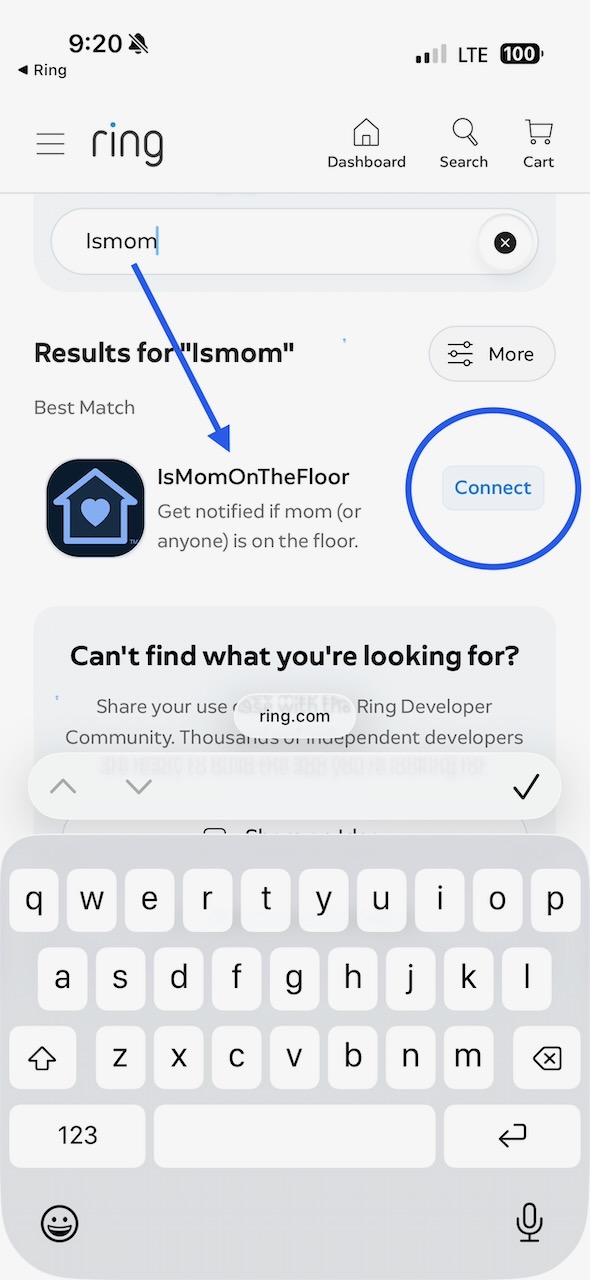
Tap Connect right in the search results…
Our app appears as the best match. Tap the Connect button beside it.
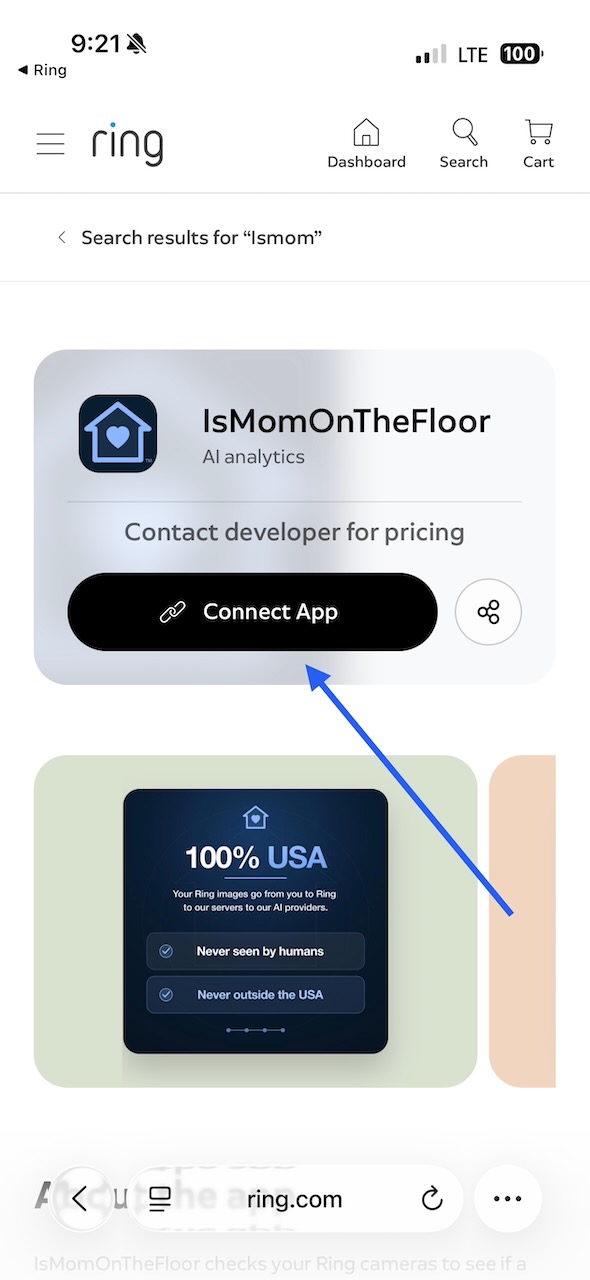
…or open our listing first, then tap Connect App.
If you tap our listing to read more about the app, the Connect App button sits at the top of the page.
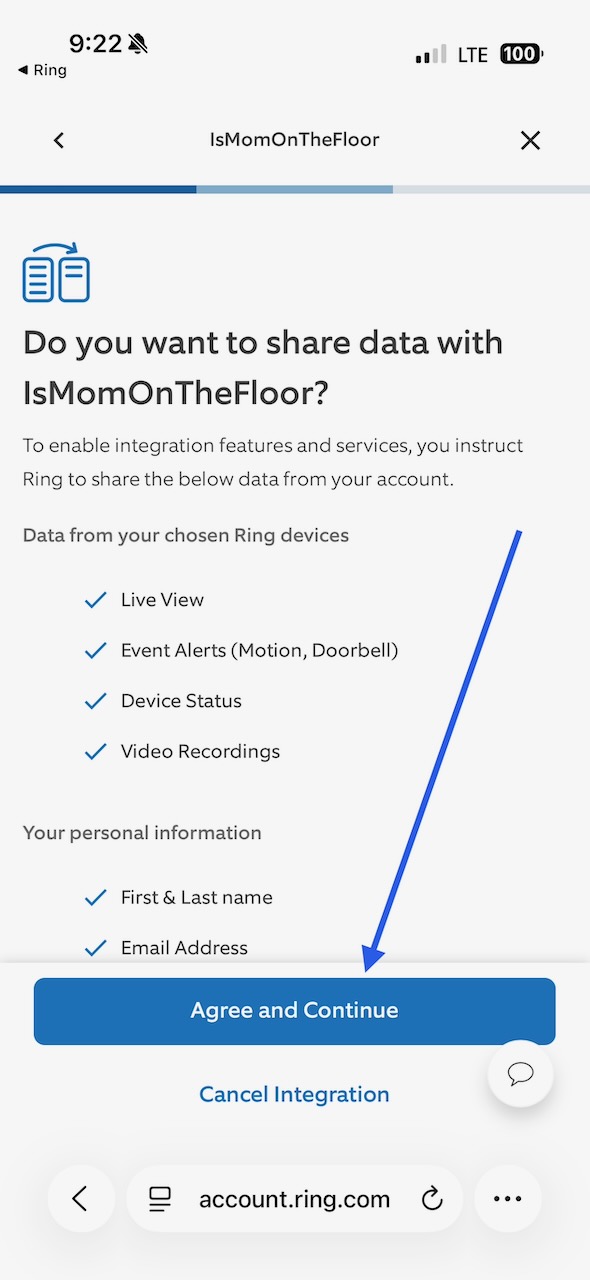
Tap Agree and Continue.
Ring lists what it will share with us: live view, event alerts, device status and recordings from your chosen cameras, plus your name and email address. Tap Agree and Continue.
Note that while Ring provides our software with interfaces to get things like live view and video, our software does not use those capabilities.
We only obtain still images for analysis. No video, no audio.
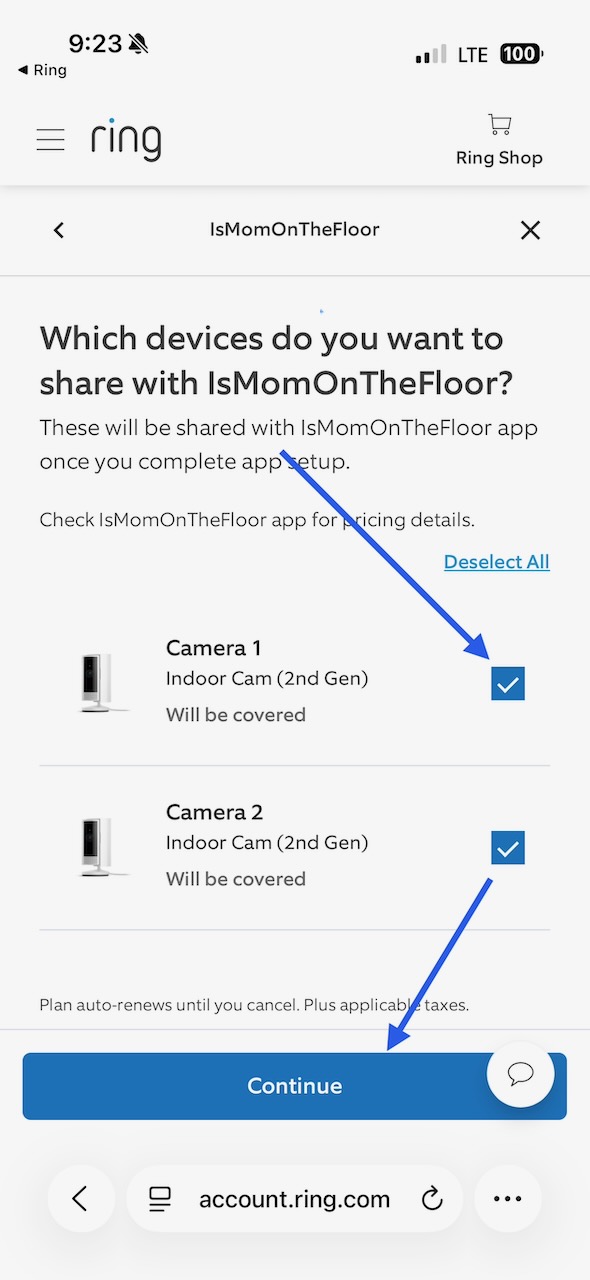
Select every camera to monitor, then tap Continue.
An un-selected camera is invisible to us, so select each camera that you want IsMomOnTheFloor to monitor, and then tap Continue.
Ring now opens our website in your phone’s web browser — that’s Part 3.
Part 3 — sign into IsMomOnTheFloor Your Ring account’s email address is your sign-in with us — no password, just a one-time code. You only have to sign into IsMomOnTheFloor from here one time; after that, anytime you follow this process from within the Ring app, you will be logged in automatically.
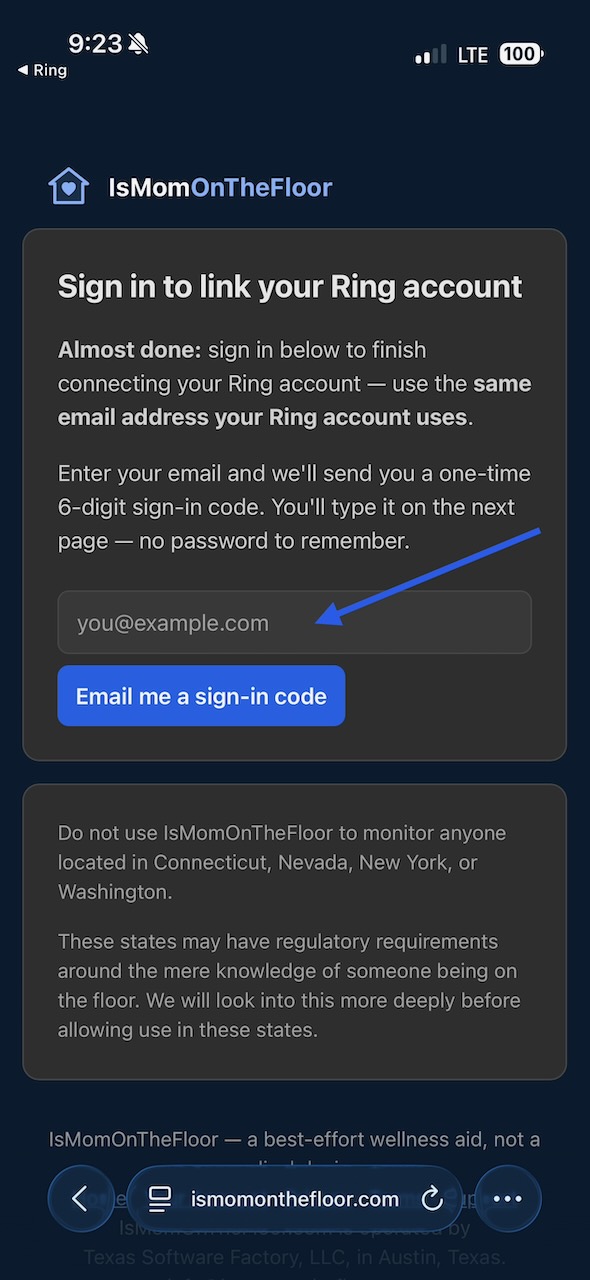
Enter the same email address your Ring account uses.
Our page says Sign in to link your Ring account. Type your Ring account’s email address and tap Email me a sign-in code.
Leave this page open.
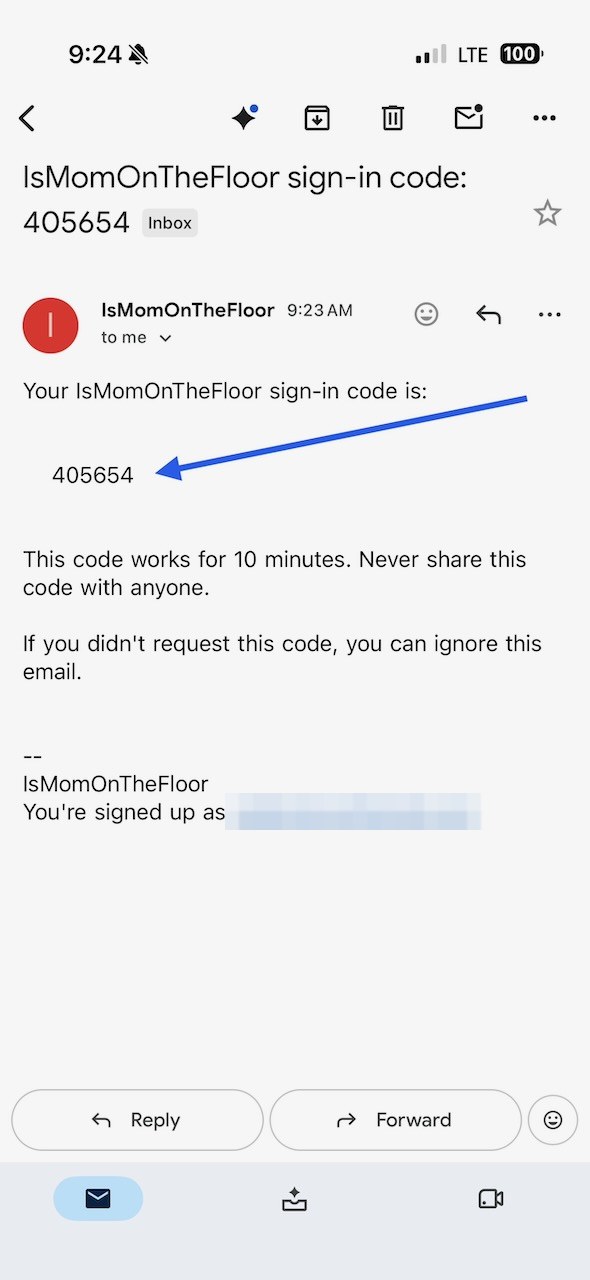
Read the 6-digit code from our email.
Within a minute you’ll get an email titled “IsMomOnTheFloor sign-in code:” followed by the code. Read the number and then go back to your phone’s web browser where the IsMomOnTheFloor login page was.
Not there after a minute? Check your spam folder. The code works for 10 minutes; never share it with anyone.
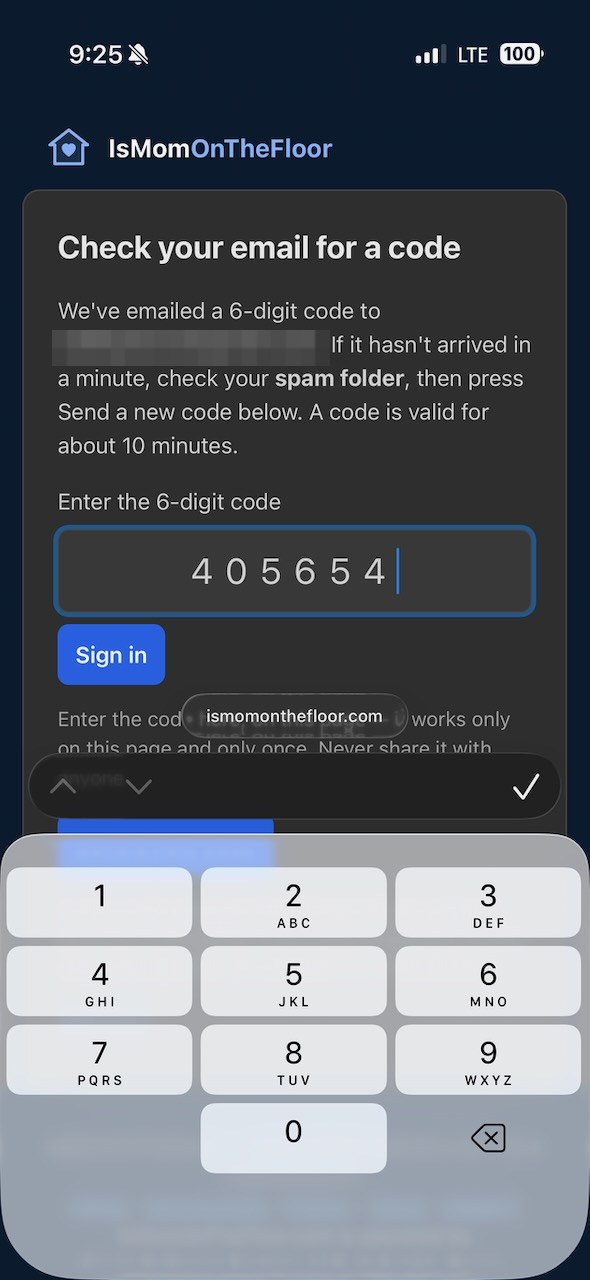
Type the code and tap Sign in.
Back on our page, enter the 6 digits and tap Sign in.
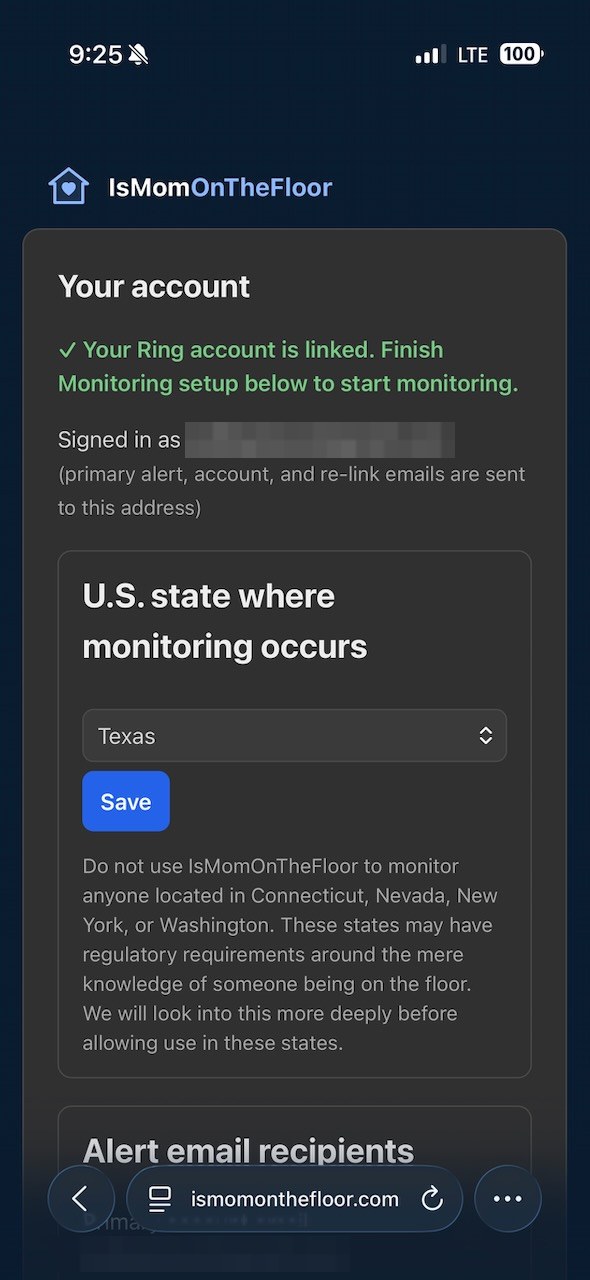
You’re linked.
Now go slowly down this page and fill in your settings.
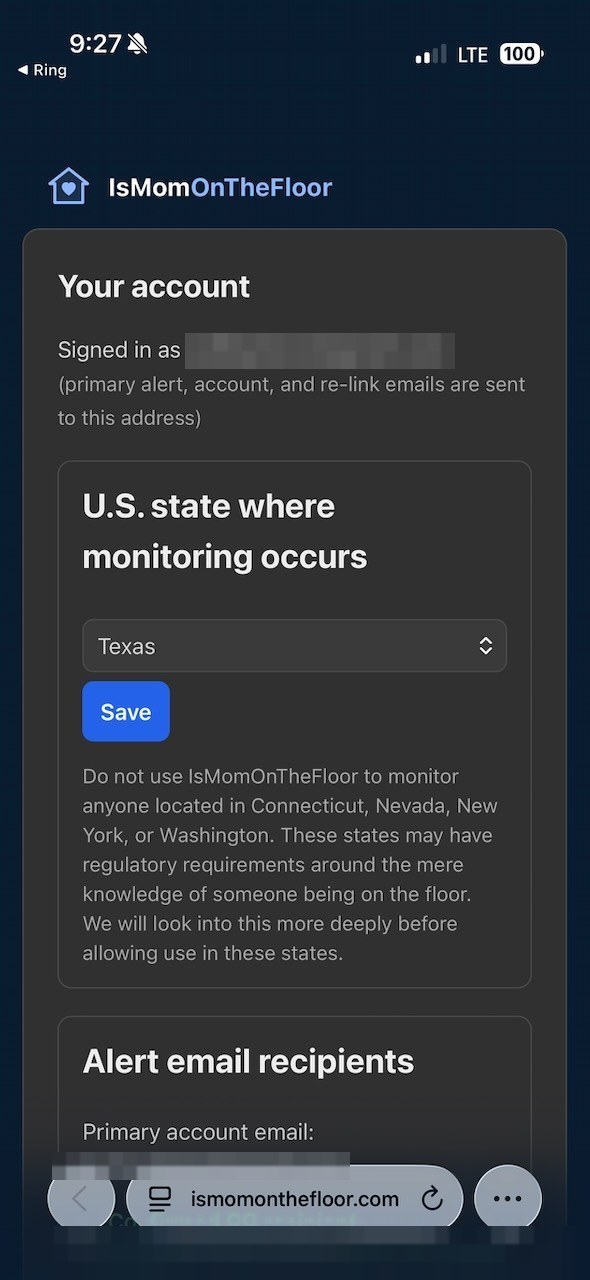
Your account page opens with ✓ Your Ring account is linked. There’s no rush — the connection is already complete, so take your time. Work down the page and press Save wherever you see it:
- U.S. state where monitoring occurs — the state where the monitored home is, not necessarily where you live. Press its Save button.
- Consent — required. Laws and regulations vary by state, but in general you must have the consent of anyone the cameras will monitor other than yourself.
- Important Settings: Alert Strictness, daily status email, image attachments, extra alert recipients, etc. Look each one over carefully.
- Press the blue Save monitoring settings button near the bottom of the page.
- Camera Count: About 1/3 down the page, you’ll see “Cameras monitored: x”. Note whether or not the number is correct. It may take a few minutes to update.
- Run a floor test. Get on the floor anywhere in camera view and press the blue ‘Test now’ button — then wait for the result email. Results will also show up on your Account page (this page). You can also test the system anytime by just sitting or lying on the floor in camera view and waiting a few minutes for a normal alert. The ‘Test now’ button just makes this faster & definite.
Part 4 — go back to the Ring app Make sure every camera you want monitored is available to IsMomOnTheFloor.
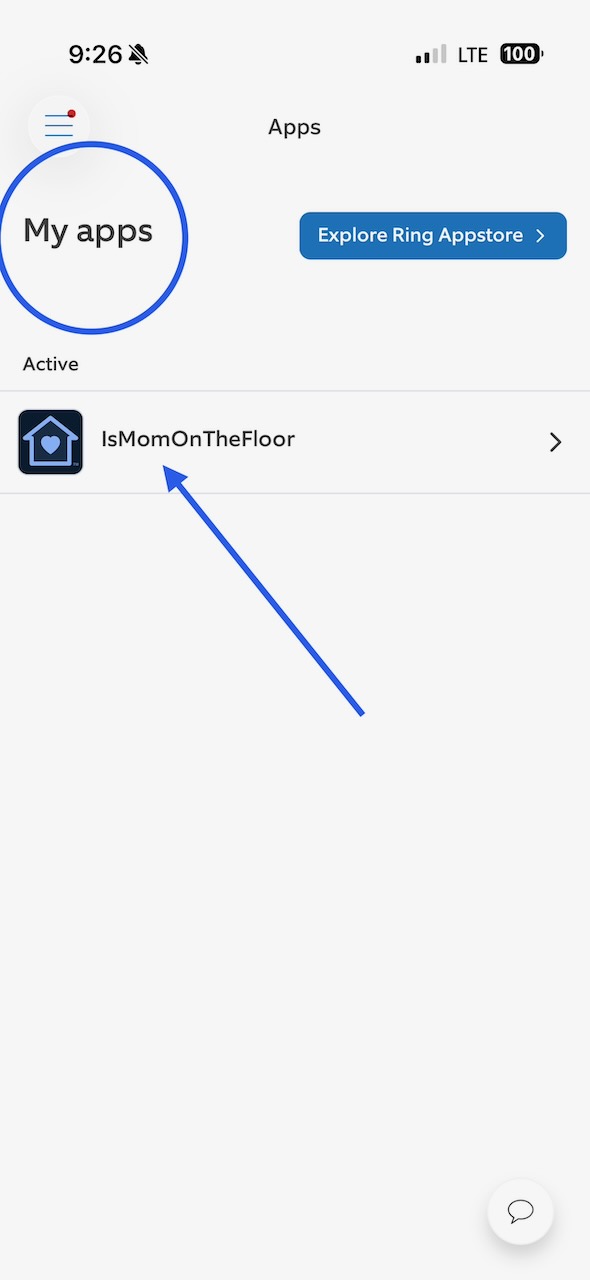
Menu → Apps now shows My apps. Tap IsMomOnTheFloor.
In your Ring app, you should see IsMomOnTheFloor listed among Active apps on your “My Apps” page. Tap IsMomOnTheFloor.
If you are in your Ring app but you do not see the “My apps” page shown here, then bring up the main navigation menu in the Ring app and choose “Apps” as shown in the smaller screenshot here.
Make sure every camera’s switch is on.
Our page inside the Ring app lists your connected cameras, each with a switch. A camera whose switch shows as ‘Off’ cannot be checked by us. Make sure that any cameras you want IsMomOnTheFloor to monitor show with an ‘On’ switch.
How to access your IsMomOnTheFloor settings
From your Ring app: Any time you want to see your IsMomOnTheFloor settings such as Alert Strictness, Image Attachments, Daily Summary, Monitored Person Consent, etc., click the blue “Go to app” button shown here to open your IsMomOnTheFloor account page from within the Ring app.
From the web: You can also see your IsMomOnTheFloor account settings any time using a web browser. Just go to IsMomOnTheFloor.com and log in.
IMPORTANT: There are many important settings in your IsMomOnTheFloor account page. These settings control how our service works for you, such as when to ignore something versus when to send an alert. These settings are NOT in the Ring app. These settings are only in your IsMomOnTheFloor account page.
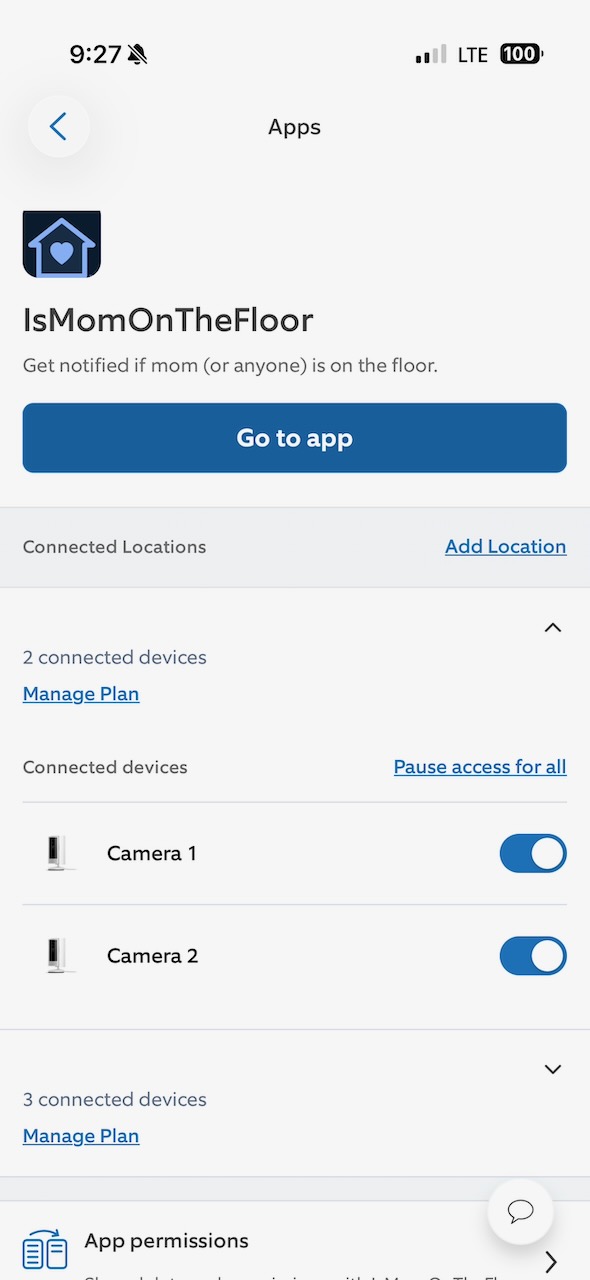
The ‘Go to app’ button takes you to your account page.
Because you originally signed in on the page that the Ring app opened for you earlier in this process, then if you click the ‘Go to app’ button now (see previous screen), then you should see your IsMomOnTheFloor account settings page right away — with no 6-digit code needed.
If something looks stuck
- Our app doesn’t appear in the Appstore search (Step 4). You’re probably signed out of Ring’s Appstore site — look for a Sign in link near the top and sign in with your Ring email and password, then search again.
- The page Ring opened asked you to sign in even though you’d signed in before. That earlier sign-in was in a different browser or on a different device. Just sign in again on that page (a minute, no password) and the connection completes.
- The connect step sometimes needs a second try. Ring’s systems can take a minute to catch up. Wait a minute and try again — it usually goes through.
- The camera count can read 0 at first. After you check the cameras (Step 7) or their switches (Step 13), give it a few minutes and look again.
- The Ring app may offer to set up a camera that’s already working. Back out and check the camera list before redoing anything.